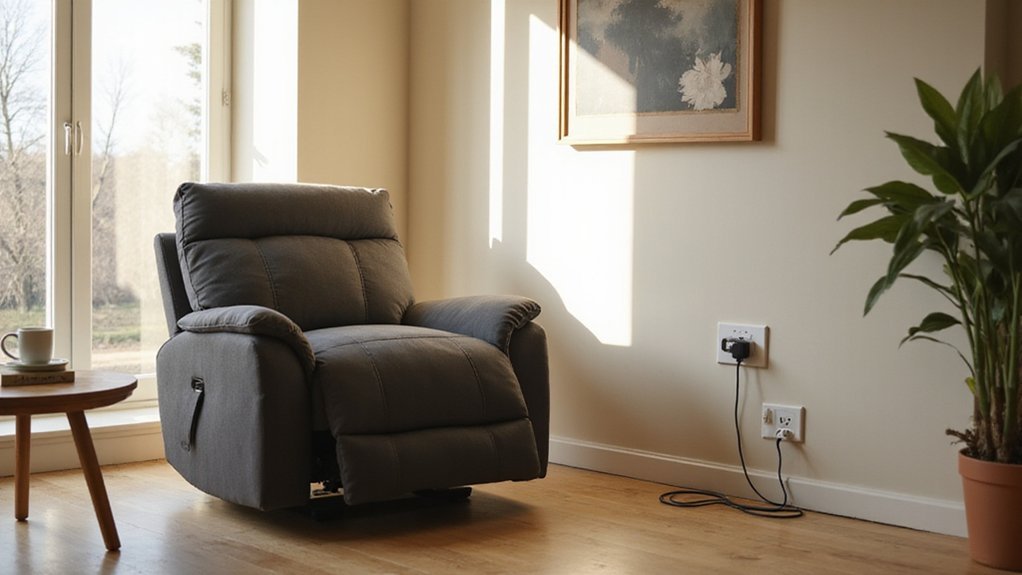
Getting your electric recliner sofa powered up and ready to use can seem tricky at first, but it’s simpler than you might think. The key is ensuring your outlet works and then connecting the right type of adapter for safe and reliable operation.
Once you’ve done that, testing the chair’s movement confirms everything is set up correctly.
Let’s walk through the steps to make sure your recliner is perfect and ready to relax.
Safety Precautions Before You Plug In
Before plugging in your electric recliner sofa, ensure electrical safety and fire prevention. First, verify that your wall outlet functions correctly and provides a proper ground by testing it with a voltage tester. Ignoring grounding can lead to electric shock. Never use an outlet that is warm, damaged, or showing signs of wear.
Keep the sofa at least one meter away from combustible materials such as curtains, beds, or paper to prevent fire hazards. Additionally, ensure the sofa is situated away from heat sources like radiators or heaters. When preparing to connect the power cord, fully unroll it and avoid running it under rugs or carpets, as trapped heat can cause overheating. Inspect the cord for any signs of damage or fraying before plugging it in.
If you must use a extension cord, choose one that is certified and marked with safety symbols such as cUL. Check that the extension cord matches the power requirements of your sofa and avoid overloading it. These safety measures help prevent electrical faults, overheating, and potential fires, protecting both your home and your family. If the recliner doesn’t move after plugging it in, checking the power supply with a multimeter is a key troubleshooting step. For persistent issues, the problem could lie within the electronic components like the control switch or wiring. Always remember to carefully disconnect any power wiring before performing any disassembly for moving or repairs.

INCLUDES: 6 foot extension cord in Black; ideal for extending power when needed

[Outdoor Ready On/Off Double Cut Switch] On/Off double cut switch extension cord, rated Max.: @23Amp 125Volt and 16Amp 250V. 3 Prong USA Canada extension power cord with 23 Amp/125Volt on off switch for household 3 Prong power devices.

INCLUDES: 10 foot extension cord in Black; ideal for extending power when needed
Locate the Motor and Power Cables Under Your Sofa
Locate the motor and power cables under your sofa by first identifying the motor unit beneath the seat cushion frame. The motor is typically mounted to a metal crossbar. Look for the motor housing, which is usually a small, round or rectangular component with a short internal cable emerging from it. This cable leads to the power port connection point. Trace the cable routing from the motor toward the back of the sofa; wires are often secured along the frame with clips or channels. Check that you can see the connector type at the motor port, such as a keyed two-pin plug, but do not connect anything yet. Before attempting any disassembly, it is wise to test connectivity throughout the system to isolate the issue. If you need to access it for repair, be prepared to remove the recliner mechanism from the frame as outlined in the guide. Your goal is simply to find and visually inspect these components. For any repair, essential tools are usually a screwdriver and pliers.
Find the Right Power Adapter for Your Recliner
To find the right power adapter for your recliner, match the output voltage exactly to 29V DC. Avoid adapters labeled as 24V or 31.5V, as using the wrong voltage can cause motor failure. A proper voltage regulation within a ±5% tolerance is essential for safe operation. Next, ensure the adapter can supply at least 2A of current, matching or exceeding the motor’s demand to prevent underpowering. Confirm that the connector is a 2-pin locking type for a secure fit. Always check for adapters with ETL or UL safety certifications and features like overload and short-circuit protection. Like other recliner maintenance tasks, these steps can be completed with basic tools and materials from a hardware store. Similar to diagnosing a mechanical recliner, inspecting the locking mechanism can reveal loose connections that affect electrical function. For multi-seat setups, a single adapter with a split connection can power multiple recliners simultaneously. Selecting an adapter with these specifications ensures compatibility and prevents potential electrical damage. This is similar to selecting the right upholstery like durable leather for longevity and ease of maintenance.

Compatibility: Adapter Parameters of Input: AC 100-240V, 2.5A-4A, 50/60Hz. Output: DC 29V, 2.0A, 58W. The interface features a 2-pin connection (one flat and one round), universal with most models of most recliner chairs, electric sofas, lift chairs and message chairs, also compatible with other devices with a 2-pin connection, like standup desks, lift tables, adjustable bed. When making your selection, please pay attention to the product specifications and interfaces

【Compatible with】:Switching power supply transformer compatible with Okin, Kaidi, Limoss, Pride, Golden, Lazboy, Flexsteel, Ashley, Room to Go, Berkline, Med-lift and Tranquil Ease Lift Chair, Cheers electric sofa, Power Recliner Motors with 2 Pin Flat Round Connection

𝗕𝗥𝗢𝗔𝗗 𝗖𝗢𝗠𝗣𝗔𝗧𝗜𝗕𝗜𝗟𝗜𝗧𝗬: Widely compatible with various popular brands of electric recliner couch/lift chairs/beds/lift tables/standing desks/Berkline/linear actuators, etc., Fits for southern motion, OKIN, Limoss, Lazboy, Pride, Golden, Catnapper, Med-lift, Ashley, Tranquil Ease Lift Chair, Cheers electric sofa and power recline DeltaDrive and BetaDrive motors. Power recliner transformer compatible with Part Numbers (include but are not limited): ZBHWX-A290020A,W52RA73-290018, HXY-270V2220A, KDDY001, KDDY008, ZB A29002.
Plug the Adapter Directly Into Your Wall Outlet
Plug the adapter directly into a standard household wall outlet and ensure it is functioning properly before connecting your recliner. Test the outlet with another appliance to confirm it supplies power. Check that the adapter’s input range, typically 100V-240V, matches your home’s .120V supply to prevent compatibility issues. Insert the plug firmly into the socket; a loose connection can prevent the indicator light from illuminating, which signals that the adapter is supplying the necessary 29V DC. Keep the cable loose and route it away from moving parts to avoid damage. Using the adapter directly in the wall outlet also helps prevent overheating, which can happen when extension cords are used. A proper power setup is essential before performing maintenance tasks such as upholstery cleaning or replacing backup batteries, and is also crucial if you ever plan a DIY upholstery project. A green indicator LED confirms the unit is operational and ready to power your furniture. Just as you would check your chair’s reclining mechanism for stability, ensuring a solid power connection is key to its operation. For recliners that also swivel or rock, this power verification should be done after any physical chair stabilization methods are completed.

This is timotion tp2 tp2p ip20 class 2 Power Supply Adapter for power recliner lift chair electric sofa

【Universal Compatible Battery Pack for Reclining Furniture】The recliner battery can works with almost all reclining furniture brand models that use a 2-prong connection-wireless battery pack for Okin, Limos, Berkline, Flexsteel, Etc.
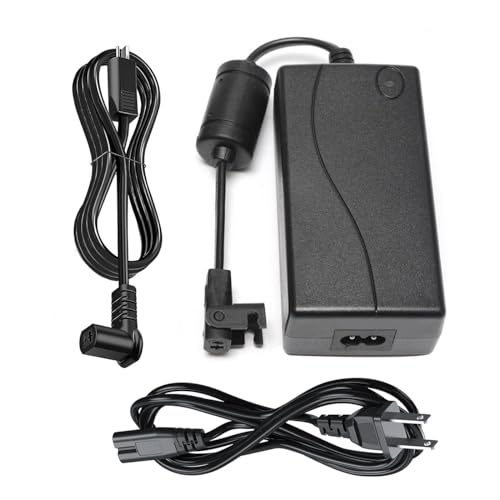
【COMPATIBLE WITH】: lojiraz recliner power supply is fully compatible with most recliner sofa brands. Such as OKIN, Limoss, Lazboy, Pride, Catnapper, Ashley and Tranquil Ease Lift Chair, Cheers electric sofa, BetaDrive, and DeltaDrive Motors. It's almost compatible with all recliners and sofas on the market.
Secure the Motor Connection: Listen for the Click
To secure the motor connection effectively, listen for an audible click when pushing the connectors together. First, ensure the motor is properly aligned so the connector port faces outward. The keyed connector only fits one way: match the flat pin with the flat slot and the round tip with the round hole. Push firmly until you hear the click, which indicates the connector lock is engaged. Check for intermittent operation based on occupant weight to verify the connection is fully secure after installation. A retention clip then snaps over a tab to prevent vibration from loosening the connection. If you don’t hear the click, recheck the motor alignment and try again. This is similar to ensuring the cable release system is properly connected when repairing a manual recliner handle. Once connected, verify that the housing sits flush with the motor port. As with any mechanical upkeep, regular inspections of the connection point can help prevent future issues. Consider selecting a recliner that complements your design style to maintain overall harmony. The connection is now secure and ready for the next step.
Connect Your Recliner’s Control Switch or Remote
To connect your recliner’s control switch or remote, locate the 5-pin round connector on the motor unit and verify the keyed orientation with its alignment notch. Firmly push the control plug into the receptacle until the retention clip snaps into place, ensuring it is fully seated without gaps. Proper cable routing is essential; trace the wire from the switch in the armrest through the metal frame to the motor, making sure it stays clear of moving parts like hinges to prevent pinching. Use zip ties to secure any excess cable length to the frame, leaving a few inches of slack to allow flexibility but avoiding tight twists that could damage the wire or restrict movement. For power recliners, it is critical to first unplug the chair as a safety precaution before inspecting any electrical components. For future maintenance, keep in mind that many upholstery components like a machine washable cover can be easily cleaned. In the event of a power outage, your chair’s motor may have a battery backup to allow basic operation. Before final reassembly, always plug in to test the switch functionality to verify correct operation. This process ensures a reliable, vibration-proof connection for your recliner’s control switch or remote.
How to Power Multiple Seats in a Sectional Sofa
To power multiple seats in your sectional sofa efficiently, you should use a combination of daisy-chain cables and Y-splitter cables. Start by connecting the main power seat to adjacent seats using a daisy-chain cable. For connecting two seats to a single outlet, a Y-splitter cable is ideal. Make sure to use color-coded connectors to guarantee proper alignment of headrest and lumbar ports, which prevents malfunctions. Secure all connections with the included retention clips to avoid loosening over time. For larger sections, a junction box can be useful to consolidate several power lines into one efficient setup. Always ensure that all wiring stays organized for safety and ease of troubleshooting. Remember, a single wall outlet can usually power the entire sectional if the connections are set up correctly. installing floor outlets is a professional solution if your furniture placement is fixed and far from a wall. Follow the manufacturer’s instructions carefully regarding plug orientations to prevent damage, and carefully wrap any excess cabling with bubble wrap or protective covers to prevent damage during future repositioning. This is especially important for modern features like dual power recliners, which require independent control for the backrest and footrest motors. Proper cable management from the start helps avoid issues like tangled wires or disconnections later.

♪ 9V DC daisy chain cable, 3-plug power cord divides 1 power source into 3 power sources, and can connect 3 pedals to the power source. It is definitely a must-have for your pedals.

9V DC daisy chain 1 to 2 power cord divides 1 power supply into 2channels, which is definitely a must-have for your pedal.
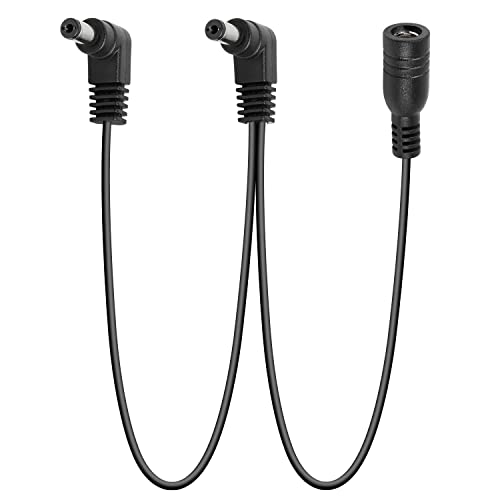
✪ Guitar Effect Pedal Power Daisy Chain Cable:9V DC Guitar Effect Pedal Power Daisy Chain Cable:If you ran short of 9v ports on the power supply for all the pedals on your new board . This cable can help you with your power supply shortage to get more pedals on the board powered up. Definitely a must-have for your pedal board.
Manage Cables for Safety and Smooth Operation
Once all power cables are connected, manage them carefully to prevent mechanical damage and ensure reliable function. Route cables along the back frame of the sofa, keeping them away from moving parts and metal pivots that could pinch or damage them. Use zip ties or the provided Velcro straps to secure loose wiring to the metal frame. Leave enough slack for the mechanism to move fully but avoid tight loops that can block airflow and cause overheating. Proper bundling helps prevent crushing, extends cable life, and maintains a tidy appearance. Make sure cables do not run near other electronics to prevent electrical interference. Regularly inspect connections and replace any frayed or stiff cables immediately to keep your system safe and operational.
Test Your Recliner’s Full Range of Motion
To test your recliner’s full range of motion, start by sitting in each seat to ensure stability before proceeding. Use the designated lever or button to activate the full recline, allowing the mechanism to complete its movement naturally. Watch for any catching, binding, or unusual noises such as squeaks or grinding sounds. Return the seat to the upright position and repeat this process two more times.
This testing cycle helps verify that the mechanism moves smoothly through its entire range. During operation, listen closely for grinding or squeaking sounds; a slight hum is typical. Operate the recliner several times in succession to confirm all functions transition seamlessly. While the mechanism is moving, visually inspect underneath the chair to ensure no wires are pinched and all connections remain secure. On electric models, press each button to verify they respond correctly and activate the intended motions.
Troubleshooting: No Power, Loose Connections, and Tripped Breakers
If your electric recliner isn’t responding, start by checking for a power issue, loose connections, or a tripped breaker. First, test the wall outlet by plugging in a lamp or another device. If it doesn’t turn on, the outlet may be dead. Then, look at your home’s electrical panel and reset any tripped breaker that controls the outlet. Keep in mind that your recliner’s power draw might trip a breaker shared with other appliances—using a dedicated outlet can prevent this problem.
Next, inspect all connections between the power cord, transformer, and motor. Make sure the main plug is fully inserted into the socket. Follow the cord to find any multi-pin connectors, and ensure they are securely snapped together. Loose or disconnected connectors are common causes of power failure. If using a wireless battery pack, ensure it has been fully charged and is properly connected directly to the motor. Finally, check the transformer itself. If the green LED indicator is missing from the transformer, it likely means the unit has failed and needs replacing to restore operation.

【Compatibility】: The Pazyry power recliner power adapter is compatible with most recliner and sofa brands, including OKIN, Limoss, Lazboy, Pride, Catnapper, Ashley, Tranquil Ease lift chairs, Cheers electric sofas, as well as BetaDrive and DeltaDrive motors.

[Compatibility]: This power adapter for electric recliners is suitable for electric recliners, lift chairs, electric sofas, Lazy Boy recliners, reclining furniture, and Cheers electric sofas; as well as DeltaDrive and BetaDrive electric recliner motors, and Med-lift and Tranquil Ease products equipped with 2-pin connectors. It is compatible with most brands, Suitable for OKIN, Limoss, Pride, Golden, Lazboy, Berkline,, and others. Please check the product specifications and connectors

【Compatibility】: TTmagic Power recliner power supply compatible with most recliner sofas, lift chairs, electric sofas, and adjustable beds from popular brands including OKIN, Limoss, Lazboy, Pride, Catnapper, Ashley, Tranquil Ease, Cheers, BetaDrive, DeltaDrive, and more. The 2-pin motor connection (one flat, one round) matches a wide range of models. If the connector matches your device, it will work.