If your recliner won’t release and you’re stuck in a tricky spot, you’re not alone. Sometimes, it’s a simple fix like a jam or loose part.
While other times, it could be more involved. The good news is that most issues can be resolved with a little troubleshooting.
Keep reading to learn how to get your recliner working smoothly again.
Start With These Essential Safety Steps
Before attempting to fix a stuck recliner, prioritize safety to avoid injury or electrical hazards. Start by unplugging the chair from the wall outlet completely—this step is crucial for resetting the power supply and preventing accidental shocks. Examine the entire power cord for any fraying, cuts, or damage; a compromised cord can pose a risk of electrical shock. A methodical approach to careful diagnosis will help isolate electrical issues without risk. Never work on the mechanism while the chair is plugged in, and always disconnect the power first. It is also advisable to identify the recliner model as manual and electric recliners have different internal mechanisms and safety considerations. For electric recliners, carefully disconnect and organize any power wiring during your inspection to prevent damage and simplify reassembly. Keep your tools and hands away from pinch points and moving parts to prevent pinching or crushing injuries. Be cautious around internal wiring or motors—avoid contact with these components. Lastly, do not force the chair or apply excessive pressure, as doing so can worsen a mechanical jam or cause damage to the upholstery or fabric.
Diagnose Your Stuck Recliner: Mechanical vs. Electrical
First, check the electrical circuitry. Make sure the power cord is securely plugged into a working outlet. Inspect the cord for any visible damage such as cuts, frays, or burn marks, which could prevent power from reaching the chair. Verify the transformer’s indicator light is on; if it’s off, try resetting the unit if possible or replacing the transformer altogether. Test the buttons on the hand control to ensure they respond correctly; unresponsive buttons may indicate a faulty control or wiring issue. Behind the scenes, examine all visible wiring connections for looseness, corrosion, or fraying. Utilize a surge protector to further guard against unforeseen power issues that could damage components. The electric motor works with gears and levers to move the chair, so a failure here can cause a complete lock-up. If power is reaching the motor but the recliner still remains stuck, the problem likely lies within the mechanical components, such as internal gears or the actuator. For chairs converted from manual operation, ensure the installed motorized mechanism is properly aligned and secured. These components will require separate inspection and repair from the electrical system. Remember, even a fully functional motor typically draws a modest 50 to „150 watts during operation, so a significant power draw or complete lack of it can be a diagnostic clue.
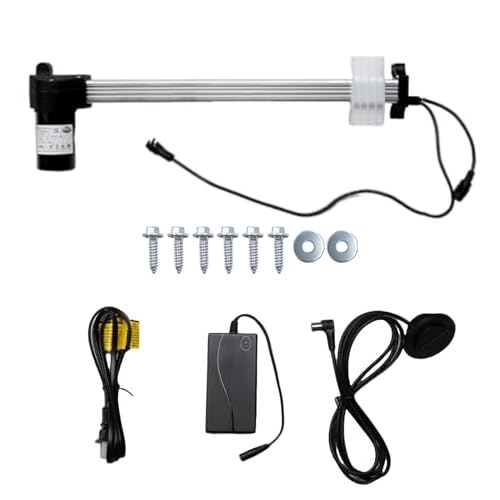
RMT Recliner Motor Actuator Replacement Model R812302040333 made by RMT The motor can replace rmt motor model R8123C2040333, R8123K2S40333 and Cenro motor HK5002 Stroke: 333...
Clear Debris and Restore Spring Tension
To clear debris and restore spring tension on a recliner, follow these steps. First, tip the chair forward to access its underside. Before proceeding, it’s a good practice to check the chair’s structural integrity for any signs of damage. For a recliner that leans to one side or won’t close properly, you may need to clean and realign tracks for smooth operation. Inspect the tracks and moving joints for lodged debris or dust buildup, which can hinder smooth operation. Use a soft brush or vacuum to remove any dirt or dust. Next, locate the spring adjustment knobs, usually near the tension springs under the seat. Turn the knobs clockwise to increase resistance if the mechanism feels loose, or counterclockwise if it is too stiff. Make small, incremental adjustments and test the recliner after each turn to find the right balance for effortless, smooth movement. Remember, attentive upkeep can help prevent premature failure and extend the average lifespan of power recliners.

Length: 24cm (9.45 inch) Reasonable length, easy to handle and clean.

2-in-1 Brush and Scraper for Deep Cleaning: This groove cleaning brush features a 2-in-1 design with hard bristles on one side and a hidden scraper on the other, allowing you to tackle both loose dirt and stubborn, caked-on grime. Use the stiff bristle brush to sweep away dust and loose debris, then flip to the built-in scraper to lift and remove hardened dirt from narrow tracks and crevices. The scraper is stored in the handle — simply pull it out when needed for extra scraping power.

DEEP CLEAN TIGHT SPACES IN SECONDS Stop struggling with dirt stuck in narrow gaps. This hard bristle crevice cleaning brush is designed with an ultra-thin head that easily reaches window tracks, grout lines, sink edges, and tight corners—removing stubborn grime other brushes can’t reach.
Repair a Loose or Damaged Release Cable
To fix a recliner when the handle feels slack or fails to release the footrest, you need to repair the release cable. Start by tipping the chair over to access the cable underneath. Inspect the plastic clip retention mechanism and the Z-shaped tail connection at the release lever for damage or disconnection. Check the metal ends of the cable for rust or separation. Use needle-nose pliers to release the cable connectors, then feed a new cable through the same pathway. Replacement handle and cable kits are available online or through recliner part suppliers. Adjust the tension by hooking the cable end into the correct hole on the release mechanism, ensuring it is properly seated. Choice of hole affects the trigger’s tension and responsiveness. For other chair maintenance, you can often achieve a smooth and secure fit by using a snug-fitting chair cover. Secure the handle assembly back in place, then test the footrest to confirm it releases smoothly. It is crucial to ensure no obstacles are around while performing this test adjustment. Proper routing and tight connections are key to maintaining a firm, reliable release.

Fits Most Recliners: replacement pull handle with cable for manual recliner sofa, couch and chair; works with most major brands like Ashley and Lazy Boy. Exposed cable length is 5.1 in from the clip to the top of the Z-hook bend; to the cable sleeve it reads about 4.7 in, to the hook tip about 5.5 in - if your old cable measures anywhere in between, this is the right part.
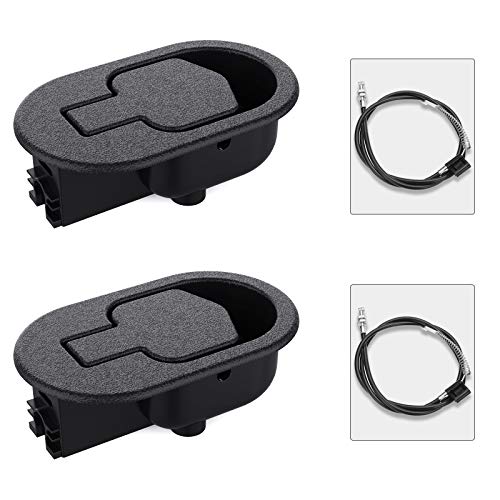
【BARIDWON Recliner Replacement Parts:】 Ideal for replacing worn-out and broken recliner handles and cables. Compatible with most major recliner sofa brands, like Ashley, Lazy Boy and more. (NOTE: Measure your original handles and cables to ensure compatibility before buying)

【Universal Replacement Handle】Universal replacement handle is found in any lever style recliner brands with this type of outside handle.It with long cable fit most major furniture and recliner brands, such as Ashley, Lazy Boy.
Fix a Jammed Manual Recliner Mechanism
If your manual recliner is jammed, you’ll need to access the internal mechanism to fix it properly. Start by removing the upholstery carefully to expose the gear assembly and linkages. Check for any obstructions or debris that might be blocking movement and clear them out. Inspect the gears for cracks or stripped teeth, as these are common causes of locking mechanisms. Examine the springs; if any have lost tension or are broken, reattach or replace them to restore proper pull force. A common repair for sagging seats involves replacing zig-zag springs, which you can source from hardware or specialty suppliers. Ensure that the frame is aligned correctly and that the recliner sits flat, as misalignment can cause jamming. Carefully disassemble the jammed parts, clean all components thoroughly, and apply a suitable lubricant to pivot points. Tighten all bolts to restore stability and prevent additional wear, which can also contribute to jamming. While this repair can address jamming, remember that using a recliner for nightly sleep can potentially lead to poor spinal alignment. If you had to detach the backrest during this process, ensure you correctly re-engage its locking levers or clips upon reassembly. Once reassembled, test to make sure all linkages move smoothly before replacing the upholstery.

Match by Size: oval handle face 3.5 by 3 in; exposed cable length about 4.75 in, measured from the buckle to the top of the Z-hook bend; total cable length about 37 in. Compare these three numbers with your original part - sizes vary a lot between models, so measure first.

【BARIDWON Recliner Replacement Parts:】 Ideal for replacing worn-out and broken recliner handles and cables. Compatible with most major recliner sofa brands, like Ashley, Lazy Boy and more. (NOTE: Measure your original handles and cables to ensure compatibility before buying)
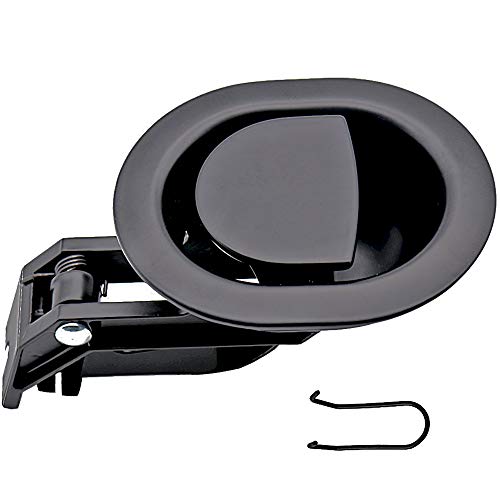
【Universal Recliner Part】Couch release handle size is 3.5" by 3", This Recliner handle replacement is a universal part found in Ashley Furniture and most recliner brands.
Troubleshoot a Stuck Powered Recliner
Since a stuck powered recliner often has electrical causes, start by verifying the power source and connections. Plug a lamp into the outlet to confirm it supplies power and ensure the recliner’s power cord is fully seated in the outlet and the connection port. Check the transformer’s LED indicator light; if it’s off or flickering, the transformer might be faulty or not receiving power, but note that it can sometimes show power even if the current is insufficient for operation.
For remote-controlled recliners, replace the batteries in the remote to rule out weak power as the cause. It is also wise to carefully check for any loose remote wiring on the chair’s control panel that could interrupt the signal. Reset the system by unplugging the chair from the power outlet and leaving it unplugged for 20 minutes. After this, press any physical reset button on the chair if available. Examine wiring from the transformer to the motor, pushing all connectors in firmly to ensure secure connections.
Inspect under the seat for any caught fabric or obstructions that could be preventing movement. Sometimes upholstery or loose items can interfere with mechanical parts, similar to how you must check for obstructions during a swivel base installation. Before manually adjusting parts, ensure the upholstery integrity is not compromised by trapped debris from lack of regular cleaning. Manually push the footrest down to see if it clicks into place; this can indicate a temporary mechanical jam that may be cleared by manual adjustment.

Compatibility: Adapter Parameters of Input: AC 100-240V, 2.5A-4A, 50/60Hz. Output: DC 29V, 2.0A, 58W. The interface features a 2-pin connection (one flat and one round), universal with most models of most recliner chairs, electric sofas, lift chairs and message chairs, also compatible with other devices with a 2-pin connection, like standup desks, lift tables, adjustable bed. When making your selection, please pay attention to the product specifications and interfaces

[Compatibility]: This power adapter for electric recliners is suitable for electric recliners, lift chairs, electric sofas, Lazy Boy recliners, reclining furniture, and Cheers electric sofas; as well as DeltaDrive and BetaDrive electric recliner motors, and Med-lift and Tranquil Ease products equipped with 2-pin connectors. It is compatible with most brands, Suitable for OKIN, Limoss, Pride, Golden, Lazboy, Berkline,, and others. Please check the product specifications and connectors
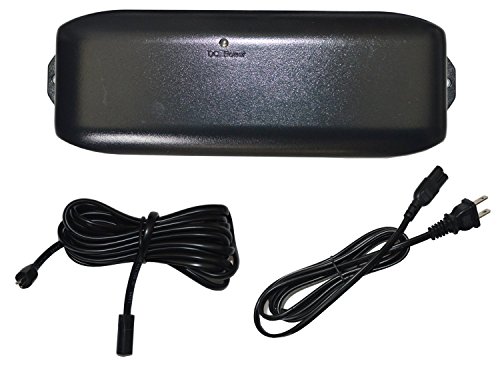
Ac Dc Switching Power Supply Transformer Class 2 Power Unit , 29V 2A transformer with battery backup function,
Reassemble Your Chair and Lubricate Moving Parts
Identify all pivot points on your chair and apply silicone spray or white lithium grease directly into the joints. Wipe away any excess lubricant to prevent messes, especially after recent upholstery cleaning. Work the mechanism by moving it back and forth several times to distribute the lubricant evenly. Avoid petroleum-based oils, as they tend to attract dust and dirt, which can cause the parts to wear out faster. If lubrication does not resolve the issue, ensure the power supply is operational by testing it with a multimeter, and verify the power cord is firmly connected to the recliner motor port. Also, check for and tighten any loose screws on the locking pawl to ensure the mechanism engages properly. For electric recliners, consider checking if your model is equipped with a manual override feature for emergency adjustments when power is unavailable.
Test Your Recliner for a Smooth Release
Once you’ve lubricated your recliner’s moving parts, it’s essential to thoroughly test the release mechanism to ensure your repair was successful. Start by sitting in the chair and pulling the handle with normal force. Watch the cable beneath the fabric to confirm it moves smoothly without binding or hesitation. The latch should release the reclining bar effortlessly, without sticking. Next, check the spring tension by manually pressing the latch; it should provide proper resistance and snap back cleanly when released. Finally, operate the chair through its full range of motion. It should lock securely in both upright and reclined positions, with no wobbling or delay, indicating a smooth, dependable release system overall. For electrical recliners, a systematic approach to diagnosing issues like a failure to release includes first verifying the power supply is functioning correctly.